Friday, October 29, 2010

Inside the Magpie Nest - a Wristcuff Tutorial

by Kimberlee

The Magpie has always been kind of like my totem animal, and like the magpie, I'm obsessed with bits and pieces of shiny ephemera.  This means, of course, that I'm also obsessed with beautiful boxes to put my Shinies
into.  Sometimes I gather all the little boxes around me and think, "What should I do with all these beauties?"

The answer for some of my Shinies came in the form of another upcycle I've been working on, fusing several old flannel shirts into a dress.  I had cut the cuffs off the shirt, and of course stuffed them into my current "too big or nifty" basket (as opposed to my scraps for that eventual quilt bag), then it occurred to me that the cuffs would be perfect for buttons, trims, and all of those flower tutorials I've been working on.

Things you will  need


Shirt cuff, cut below the seam
Buttons
Trims
All those fabric flowers you've been making
Iron-on patches 
Thread, needles
Any other shinies; like studs, rhinestones, pins, charms, and whatnots


A pile of loverlies!
 Sort out your beauties into piles of coordinating stuff.  It can be by color, style, mood, or whatever floats your boat.  I wish I had some Steampunk things, that would make a cool cuff!

Another shot of my pile
I have 4 cuffs from 2 different shirts, so I sorted my things that I might want on each cuff into ziplock baggies.
The 1st bag is the closest to Steampunk: it has patches with retro photos and buttons with gear shapes.  Bag 2 is more pretty punk with classic tats, zipper flowers and grommets.  Bag 3 is pretty and lacy, I want it to look a little like a wild west garter.  Bag 4 is today's cuff!
 Lay out everything in your bag, and don't forget to iron it!  Play around with the placement of the stuff in the bag. I suggest adding something permanent to work around.  Remove the button because you will probably have a button you are dying to use instead.


I've ironed on the yellow rose, the button hole is directly to the left of it.
Pick out the buttons you will use as closure.  You may have to change the button hole to accommodate your buttons.  I also added a second button hole so 2 buttons would show when I was wearing it.

Choosing buttons is so difficult!!!

 Arrange the rest of your goodies!  I added trim and a rose tutorial from either Sassy Scrapper or Little Birdie Secrets. You'll likely be seeing homemade blossoms on all of these.  I also sewed on some trim, a leaf for the flower, several buttons and a pin and voila it's done!
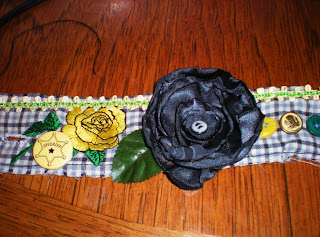
Yellow and black are a nice combo!    


.
 My only regret is that I should have loaded it up more, but since this was my first, I was a little gun-shy.  I'll post the others as I make them, and they'll  be more elaborate!
One view of the upcycled cuff.

The obverse.  Clearly, there's a new sheriff in Craft Town!

Tuesday, October 26, 2010

Give-Aways

Win this lovely Forever After Dress from Grosgrain.  It's truly gorgeous!

Craftster's Costume Contest.

Gift Tags and Beautiful Earrings on Krishenka's Beautiful Treasures.

Fat Quarters on Clearly Tangled!

Thursday, October 21, 2010

Failure and Re-Group

I've been dealing with project failure lately, and it stinks.  I was trying to made the Dress from B3598, which Butterick had marked as "easy" and I had foolishly approached as such, using my beloved Groovy Jersey fabric that I had been holding onto for a long time.  I measured it and everything. And I just tried to upload a photo, but the blog isn't cooperating.  It's probably for the best, as now I can't link to a series of photos of my massive failure.  ANYWAY, I thought I had measured enough BUT I only had enough for the front, back and ONE yes ONE sleeve.  I really wanted the long sleeves.  :(  So I thought, "Why not cut the dress shorter, make the bottom out of black fabric, and have enough for 2 sleeves??"

So I again cut my pretty fabric to have enough for sleeves, and sewed on a black jersey to the bottom.  I was feeling pretty good about all this, but after I laid it out, it looked....well, ugly. I don't even have a photo of it!  I thought, "Well, I'll sew it anyway and see if I have something to work with.  And I wish I had just cut the great fabric longer and turned it into a tunic!"  Then, the unheard of happened...the machine ATE it, like, sucked it into the bobbin.  I had to cut it out of the machine!

Sooo angry.  I haven't been able to make a garment since the Ren Dress.

I took a step back and a deep breath, and decided to reorganize.  I have several projects started that I need to finish - a faux leather belt, a vinyl purse, and a re-purposed flannel shirt dress.  I've been meaning to teach myself how to make cloth flowers.  I hate working with pattern tissue!  I wanted to make wrist bands!

The flowers have been fun, I've been mixing at matching little bundles of fabric, and I am going to use some of them to make wrist bands.

I'm using the wrist cuffs off the afore-mentioned flannels, they are just the right size, and they have a built in button-hole, which is plus.

Also as I mentioned, I hate working with tissue paper, so I decided to affix some of my patterns.  I used watered down white glue, craft paper and a large brush.  You only have to coat the top of the tissue, as it soaks through to the craft paper.  Be careful and watch for bubbles, and when it dries it is AWESOME.  Just cut around the lines and you're done.  I mark the pattern number and what it is on the outside of the roll, and tie a clip onto the tying cord to hold the smaller pattern pieces.
Pre-cut patterns.


I'm getting pretty good at the rosettes, too.  More complicated flowers to follow soon!

So I am not quite sure where to go next - jump into a project, do some of this smaller prep-work, or what.  Any ideas?


Monday, October 18, 2010

More Shiny Than Sew-y

I guess I lied. I did intend to post on my next sewing project. Then I got busy shingling the dollhouse roof, and turned back to an ongoing bead project while the glue was drying (has to cure overnight before I can do anything more with it, anyway). So, tonight, my head's full of the sparkly and the shiny and the pretty little wonders that are beads.

This is the project I've been working on tonight - a reversible cat-face amulet bag in peyote stitch. I stopped just at the point of dividing for the ears. (This is an earlier shot - I'll post the finished weave when it's done.) It's just such a joyous process, row by row seeing the design emerge. I loved the moment when those beautiful blue and green eyes, respectively, were complete and gazing at me.


I can't remember a time when I haven't been messing about with beads - from the "Indian Bead Loom" I made friendship bracelets on as a kid, or learning from my mom how to use wire and bugle beads to make rings, right on to using them as costume embellishment.

But it was bead-weaving that really first spoke to me, as an adult. Like pointillist painting, but in a shinier medium, you might say. I started with Sigrid Wynne-Evans' brick stitch earrings, and then became fascinated by peyote stitch and Amy Loh-Kupser's designs, like this polar bear amulet.


From there it was on to dimensional pieces...


And, more recently, tiny beaded books that actually open, based on Maxine Peretz Prange's instructions but my own charted designs (using a terrific shareware program called BeadTool).


I guess part of the appeal is that it's almost like having the chance to weave your own fabric (though, oddly, my interest in weaving never went further than those loop-based potholder looms...).

No, who am I kidding? It's all about the glitz and the "ooh-ahh" moments when you confidently say to someone. "This? Oh, I made it..."

Sewing next time. I promise!

Friday, October 15, 2010

My First Muslin AND First Darts

by Kimberlee
 I've been terrified by one of my patterns that I've also been dying to make, Simplicity 2444.  I haven't been sewing that long, about a year, and I only made my first dress about a month ago, but I've had the pattern for A WHILE now, back to when I used my archaic New Home/Janome machine.  Did you know that only one place in the entire US carries parts for this type of machine, and it's in California?  Yeah, me neither until it broke.  Which is ok because it weighed about 25 lbs and didn't even have a reverse setting.

Anyway, one of the reasons I was so scared of the pattern was the presence of darting in the bodice, but I shouldn't have been.  I also am so relieved I chose to do a muslin of this dress!  I killed two birds with one stone (not that I would, I love birds) by getting a jump start on the apron I've been wanting to make and discovering that the pattern I was using would be a little too snug for me.
 Don't say you haven't ever used a chair as a dress form.


Fairly well made darts, not bad for the first time.

So that's it!  Next time, I'll try not to be so afraid of trying a new trick!  It's only sewing, after all.

Sundries and Plunder Guest Giveaway

Check out Grosgrain (a blog I follow religiously!) for this amazing mask give-away. These would look amazing in a wall of any room.

Sundries and Plunder Guest Giveaway

"Sundries and Plunder is run by two sisters from Oregon, one living in Portland, and the other in Bend. Between being raised by creative parents, and the need to stay entertained during the Pacific Northwest's long rainy season, it was probably inevitable that the two would become two insatiable crafters."


Tuesday, October 12, 2010

MORE flowers

One of my favorite sewing blogs, Adventures in Dressmaking, had a new tutorial on flower-making.  I HAD to put it up!

Fancy Fabric Flowers Two Ways

Upholstering the Past

Friends on Facebook know that for the past year, on and off (mostly off, until recently), I've been building a four-story Georgian manor house in inch/foot scale.


The basement section


The house proper

The plans for the interior are, if anything, even more ambitious. And apart from wallcoverings, flooring, electric wiring and fixtures, they involve fabric! Most of the furnishings are going to be built by me using old "House of Miniatures" kits found for a steal on eBay. Their stock fabric choice, though, for anything upholstered, is a boring blue cotton.


That won't do for my Duke and Duchess. So I'll offer you a preview of the fabrics I have lined up to furnish this beauty! Many of them come from the annual sewing show held in downtown Victoria - where I went a little bonkers at the booth of a glorious vendor, Mostly Silk. Others I've picked up in grab bags of silk scraps from Gala Fabrics at the Victoria Quilters' Guild show, or at SAS Fabrics by the Pound in Tucson. (Kimberlee, you'll also recognize some of the fat quarters you sent me from the Mark Twain House!)


I picked up this huge lace panel at SAS for, I think, about $1.25. There's enough here for all my windows. I'll use the striped section for the formal ground-floor rooms and the rest for everything else.


These will be the draperies for the formal rooms - the pleated gold for the drapes themselves and the textured for valances and possibly tiebacks.


Drawing room fabrics for sofas and chairs. This will also double as the music room, complete with grand piano and harp.


The library/dining room will be a little more sedate. I also have some pieces of leather which I'll be using on one of the wing chair kits, for the Duke's desk.


The color palette of the Duke's bedroom is in burgundy and gold, highlighted by a splendid carved wooden bed.


The Duchess' bedroom is much more feminine, in a palette of pale pinks.


Guest quarters are not quite as opulent, but still with a certain elegance.


Servants' quarters and the kitchen area downstairs will be simpler, but still cheerful and in period colors.

Watch this space - and my ongoing photo album for this project on Facebook - to see how it all comes together over these coming months!

Something Wicked this Way Comes

Confession - I unabashedly love Halloween, so much so that I coo over Martha Stewart's Magazine, which I usually ignore.  I was pretty impressed with this year's 10 dollar opus on Halloween, which I have read cover to cover (albeit during trips to the grocery store - I can't be the only one who sees those places as lending libraries).  Anyway, I spent a big part of my weekend decorating our balcony, and my goal was to spend as little cash as possible buying new things.  I think it turned out pretty well.

Our chairs got the leaf garland treatment, I had this left over from a post-Halloween sale last year.

I sunk a large rock and a Styrofoam block into  a coffee can and put that into a larger pot.  I gathered several spooky-looking branches, spray painted them black, and sunk them into the foam.  I just added spanish moss and little ghosts made of cheesecloth.

 This is the spiderweb wall.  That stuff sticks to everything.
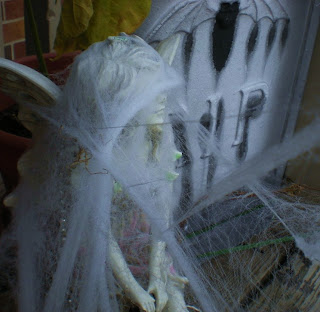
 The spooky "graveyard."  My pretty fairy statues look like creepy angels covered in the webbing.
 YIKES!  See?
 A fairly good view of most of the right side.
 Mr. Bones presides over the balcony.  He was also picked up last year after Halloween.
GARRRRRR!!!!!!!

I'll try tonight to take some decent night photos from the ground.  All that webbing looks neat lit up with the orange lighting, the balcony seems to glow, and looks like a little haunted room.

Oh, unless I forget:

Pumpkins!!!

As far as sewing is concerned, I don't have a costume in the pipeline, unfortunately.  I am working on a red vinyl purse, which is going to look really cool.  I've also been drooling over fabric flowers , which are literally all over the sewing and crafting blogs.  I've been cutting squares of coordinating fabric to try some, and I'll post the results.

As far as bigger projects, I've been planning on getting started with the Coordinating Wardrobe. I need to go get fabric for the Wardrobe, I don't usually have anything larger than a yard hanging around, which brings me to my final thought:

 I plan on making the dress several times, with differing sleeve and hem lengths, if it turns out as nice as the pattern looks (I'm going to try it in a cotton/cashmere mix as well as sweatshirt material), and I do have one jersey fabric lying around that is going to be the "basis" of my coordination.  It's a lovely retro pattern, and the only thing I have that's over a yard. Is it just me who experiences anxiety cutting into a new fabric, or starting a project?   I hem and haw over which fabric to use for stuff, even fabric less than a yard and small projects.
I'm often scared to death of cutting into fabric - I know I'm going to make lots of mistakes sewing!  Does anyone else have these issues?

Friday, October 8, 2010

Sew What?

by Eileen

Since Kimberlee shared the backstory of her journey to sewing as a creative outlet, I thought I'd offer mine, too.

Sewing was everywhere in my house when I was growing up. My mom earned a living with her needle, first working in a western-wear factory and then from home - a mix of alterations for a nearby dress shop, and everything from hems to custom work for her "ladies," mostly elderly wealthy women with names like Bernice and Maxine. She outlasted at least six different sewing machines that I can remember, and this back in the day when they were complex mechanical marvels built to last in industrial metal cases, not today's computer-chip-and-plastic concoctions.

Only one machine had a longer history. We had my grandmother's Singer treadle machine from the 1900s. I learned to sew on it, pumping the treadle and cranking out Hollie Hobbie and Barbie clothes. It lives in my dining room now, and is still in working order and complete with all its arcane attachments after a century; we even found some spare belts for the treadle when we lived in San Jose. (The photo is not of my actual machine, but a better-preserved one: the same beautiful carving is on the drawers, though.)


I don't think, growing up, that I had any store-bought clothing apart from underwear, my Girl Scout uniform, winter coats, and jeans. Which meant, of course, that somewhere in high school I concluded that I was never going to sew when I grew up. The thought of cutting tags off something store-bought was a magical idea to me.

And then I went away to college. My December birthday arrived, and Mom phoned to say that they had gotten me a sewing machine. They'd made arrangements for it to be picked up from the Sears catalog center in my college town.

Lacking wheels, my roommate and I took a cab there and they handed over the box. Opening it up back at the dorm, my heart sank. Inside was no gleaming-new machine, but a pea-green industrial critter that looked like the Waltons might have repaired it dozens of times.

Turns out it was a mix-up, the trade was duly made, and I bought a pattern and fabric at the local shop and ran up a skirt for the holiday concert.

The gene ran true (though perhaps not quite as strong as for my sister, who spent part of her working life managing a fabric store). I was hooked. I made us kimono robes for the trip to the shower down the hallway. Staying on campus one spring break, I finished my hall costume for a SF convention. I picked up a little extra money on the side, senior year, sewing clothes for a petite classmate from Hong Kong.

Since then I've slipcovered and upholstered and curtained, made a boatload of costumes and everyday street wear, stitched my own wedding gown and my baby's layette, and finished many a quilt. I've scoured the remnant bin at Liberty of London and haggled for silk in Cloth Alley in Hong Kong. Beads and yarn and other projects compete for my attention nowadays, but there's no sign of my original obsession going away any time soon.

Crafting is healing, and self-expression, but I think it's also something more: an expression of the highest human impulse, of leaving the world a little more inventive and pretty and diverse than you found it. Orson Scott Card has a series of books in which the central character is what is known as a "Maker." One of the life lessons for that character, very early on in the sequence, is that every act of Making helps to keep away the dark.

I like to think we're doing that with every stitch!

Life, Liberty and the Pursuit of Craftiness

by Kimberlee

Full disclosure - this is my first ever clothing re-purpose.

There's an awesome Goodwill a few miles away that gets the overstock or unsold items from Target (I KNOW!!!), so I picked up this top for 2 dollars.  It was 2 sizes too big, but I figured that eventually I would take it in or something.

The things I truly fell in love with from the Liberty line were the pajamas.  I love Target, but these just blew me away, and I was lucky enough to pick up several on sale.  They were all mix and match, which was adorable, so I decided to take my day top and turn it into a camisole for nighttime.

I cut off the top right above the armholes, and put away he cute ruffled neckline for another day.  Then I measured my torso right under my armpits, and cut a 5-inch wide strip, adding a few extra inches.  I ran a lose stitch and ruched the top hem, then folded the strip in half and attached it, along with a cute trim I found in JoAnn's sale bin.  Finally, I picked out a coordinating/contrasting fabric to make the straps.

The only thing I've changed since this photo are the buttons.  I didn't really love the pinafore look (which is weird, I usually LOVE the pinafore look), so I removed the buttons and am currently trying to figure out whether to use more assertive buttons or to put a fabric flower in the back where the straps come together.


So that's it!  All in all, I'm pretty happy with how it turned out, and it's very comfy, which is what really matters!

Thursday, October 7, 2010

Autumn Snuggling

by Eileen

First, thank you to Kimberlee for allowing me to share her magpie nest! We'll both have much to feather it with as we go along, I am sure.

Here in British Columbia you just know when the season has turned from summer to fall. It's like someone flipping a cosmic switch and re-setting everything to misty, gray days, dampness in the air, emerald-green moss appearing between every patio brick, and maple leaves yellowing at the edges almost as you watch.

Today was the first real sweater day of the season, in my view, and I reached for one of my old favorites - the first sweater I made with my knitting machine (which I really need to break out again one day soon). Above and beyond the fun of seeing those rows come together so quickly, I love the heathery quality of this multi-hued yarn and the asymmetry of the collar. This was all my own design. It's wonderfully oversized and makes you want to dance through the nearest park, kicking your way through fallen leaves and looking for windfall apples.


The buttons have a special story. When the Globe Theatre was being recreated in London, traditional methods were used throughout, except as required by code, to build the structure, including the woodworking for the seating and railings and such. The leftover bits were turned into buttons. So this sweater carries a piece of Shakespearean lore with it in the form of the square oak buttons. I have a card of round ones somewhere as well...we'll have to see where they turn up.

The A-Line, the Stitch and the Wardrobe Series

by Kimberlee

I have an obsession that I suspect many of you share - JoAnn's one dollar pattern deals.  It's a great chance to save tons of cash (my last receipt told me that I had saved 107 dollars!), and to pick up stuff I would normally feel guilty about.  I would normally never buy a pattern full price anyway, unless I really need it, but what beats ten patterns to fawn over, for ten bucks?  Nothing.

My last bacchanalia brought home about half practical-half frivolous patterns from Butterick.  True revelation - I fawn over their Making History series, and picked up a caplet dress and muff, a collection of shirts, old-timey nighties, and gloves.  I have no idea what I'll do with gloves, and they look really hard, but every other pattern has something I can use. I really want to make the cape and muff with modern fabrics- the cape would look supercute with plaid and faux fur- and of course the PJs.

Another awesome thing I discovered in my dig was the Lifestyle Wardrobe Series (not everything on the link is from the series).  I picked up the cool V-neck dress centered wardrobe.

Part of the reason I love this so much is that the central dress is basic but necessary, and what a deal to get a jacket, scarf, skirt, top and pants (which I am going to use in my ongoing creation of a pajama wardrobe - that's for another post)!  The pants are no great shakes, I like my daytime pants to have non-elastic closure, but imagine taking this to your fabric store and picking up a bunch of coordinating fabrics.  That's what I dig about the Wardrobe Series - you can stamp your taste on the basic shapes, and it's a great bang for the buck (literally), even if you are paying the full price of $16.95. 

Speaking of the Historical patterns, I purchased one earlier for the Ren Faire, and am almost done with the wide, non-corset belt that will look amazing with almost any dress.  I can really see it with the basic dress from the are-mentioned project.


I know it doesn't look mostly finished, but trust it is!

So of course now I have plenty of patterns, and now the problem is fabric.  I wish JoAnns had one dollar fabric days....

Friday, October 1, 2010

Sew Be It

I did not learn to sew at my mother's knee.  My mother sewed constantly when I was young, and my wardrobe was a delicious mix of hand-me-downs and homemade.  Then I became interested in boys and popularity (I failed spectacularly at both) and refused to wear anything but clothes that Other People Had.  Then in high school, I went punk and "made" my own clothes - this mostly consisted of ripping, pinning and dyeing but no actual sewing. I leaned towards artsy as opposed to craftsy. Then, of course, life happens, and I mysteriously found myself in law school.  My artwork careened between angry and indifferent.

Suddenly, in my 34th year, I found myself with lots of time on my hands.  The Big C, Breast Cancer to be exact, crept into my life and I found myself with lots of time on my hands.  I hated the law, and I longed to make something with my hands. 

My older brother makes beautiful things: his quilts are exquisite.  I would surf the internet and long to make stuff like that.  So my dad brought me an ancient New Home sewing machine that he had found somewhere, I bought a book and made a purse!  I was overjoyed!


Creation is therapy.  Sewing is alternately joyful and infuriating. 

Please follow me as I learn to sew!  I'll take suggestions, comments, and help.  I'll post my progress, my thoughts about the healing powers of crafting, and with hope we'll all learn some truths along the way.