Showing posts with label flannel. Show all posts

Wednesday, January 12, 2011

Pillow Project - Pillow #1

Thanks, everyone, for your great suggestions for pillows!  I decided to make several pillows, so here's Pillow #1.  I decided to focus on texture for this one.


This pillow is incredibly soft - the shell is natural flannel, a new favorite fabric of mine.


The flowers are made of denim, muslin and flannel, and the adorable buttons were Christmas gifts from my co-Magpie...aren't they pretty and shiny?


I decided to sew inside the circles so that the edges of the flowers would eventually fray and give the pillow a pretty, almost shabby chic effect.

So pillow number one is done! Thank you again for all the advice, much of which I will be using as I go along.  Take care and much love!

Saturday, November 27, 2010

I Can't Believe I Didn't Think of this Sooner! Flannel Slip *Tutorial*

by Kimberlee

There are just some moments in life where I slap my forehead and say, "It's so simple!  Why didn't I do this sooner?!"

While I was sewing my underskirt for the flannel petticoat, I was not only thinking about how much I was looking forward to making another with a different technique, but how warm the A-line underskirt would be in the Minnesota winter.  And while I was making the skirt, I thought, "Maybe a flannel skirt WOULD be nice."  Then it occurred to me that maybe a flannel SLIP would be nice, so all my skirts would be toasty!

I've never seen a flannel slip in my life.  It's difficult enough to find a decent slip anyway, and I'm a big fan.  I COULD wax poetic about slips, and how we should all still be wearing them, but I'll spare you and get to the good stuff.

You'll need
- a slip that you want a flannel version of
- Flannel (I like natural color for this, but heck, use whatever you want)
- Thread (I'm using a contrast color, just for fun
- Elastic
- Craft paper


 Measure your slip and transfer your pattern onto the craft paper.  Cut 2 panels from the flannel.


 Remember to mark the place where your slip has slits, flip panels inside out and sew down to the slits.  I chose to then turn the skirt right side out and sew my hem by folding the fabric under.  Make sure to hem the top of the skirt leaving enough room to insert the elastic, and an unsewn opening to insert the elastic.

slit markings


 I like to measure my elastic by putting it around the place where I want it to fit, and stretching it to where I feel comfy.  This elastic was a little wide for my slip, so I trimmed it down.  Seriously, sometimes you don't need to run out to get something else, especially something that will be entirely unseen in a few seconds.  And you know what to do next - put a safety pin on the end of the elastic and thread it through!  Stitch the elastic, sew up the open hole, and you are done!


 You are now ready to rock the Winter Skirt look much more warmly!  You can certainly cuten up the slip by adding little rosettes, or a bow, ruffle, or whatever else floats your boat.

Thanks, and have a wonderful weekend!

Friday, October 29, 2010

Inside the Magpie Nest - a Wristcuff Tutorial

by Kimberlee

The Magpie has always been kind of like my totem animal, and like the magpie, I'm obsessed with bits and pieces of shiny ephemera.  This means, of course, that I'm also obsessed with beautiful boxes to put my Shinies
into.  Sometimes I gather all the little boxes around me and think, "What should I do with all these beauties?"

The answer for some of my Shinies came in the form of another upcycle I've been working on, fusing several old flannel shirts into a dress.  I had cut the cuffs off the shirt, and of course stuffed them into my current "too big or nifty" basket (as opposed to my scraps for that eventual quilt bag), then it occurred to me that the cuffs would be perfect for buttons, trims, and all of those flower tutorials I've been working on.

Things you will  need


Shirt cuff, cut below the seam
Buttons
Trims
All those fabric flowers you've been making
Iron-on patches 
Thread, needles
Any other shinies; like studs, rhinestones, pins, charms, and whatnots


A pile of loverlies!
 Sort out your beauties into piles of coordinating stuff.  It can be by color, style, mood, or whatever floats your boat.  I wish I had some Steampunk things, that would make a cool cuff!

Another shot of my pile
I have 4 cuffs from 2 different shirts, so I sorted my things that I might want on each cuff into ziplock baggies.
The 1st bag is the closest to Steampunk: it has patches with retro photos and buttons with gear shapes.  Bag 2 is more pretty punk with classic tats, zipper flowers and grommets.  Bag 3 is pretty and lacy, I want it to look a little like a wild west garter.  Bag 4 is today's cuff!
 Lay out everything in your bag, and don't forget to iron it!  Play around with the placement of the stuff in the bag. I suggest adding something permanent to work around.  Remove the button because you will probably have a button you are dying to use instead.


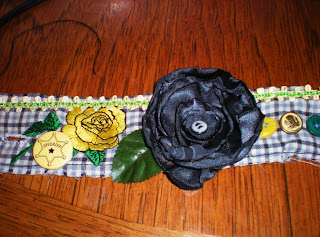
I've ironed on the yellow rose, the button hole is directly to the left of it.
Pick out the buttons you will use as closure.  You may have to change the button hole to accommodate your buttons.  I also added a second button hole so 2 buttons would show when I was wearing it.

Choosing buttons is so difficult!!!

 Arrange the rest of your goodies!  I added trim and a rose tutorial from either Sassy Scrapper or Little Birdie Secrets. You'll likely be seeing homemade blossoms on all of these.  I also sewed on some trim, a leaf for the flower, several buttons and a pin and voila it's done!

Yellow and black are a nice combo!    


.
 My only regret is that I should have loaded it up more, but since this was my first, I was a little gun-shy.  I'll post the others as I make them, and they'll  be more elaborate!
One view of the upcycled cuff.

The obverse.  Clearly, there's a new sheriff in Craft Town!