The Magpie has always been kind of like my totem animal, and like the magpie, I'm obsessed with bits and pieces of shiny ephemera. This means, of course, that I'm also obsessed with beautiful boxes to put my Shinies
into. Sometimes I gather all the little boxes around me and think, "What should I do with all these beauties?"
The answer for some of my Shinies came in the form of another upcycle I've been working on, fusing several old flannel shirts into a dress. I had cut the cuffs off the shirt, and of course stuffed them into my current "too big or nifty" basket (as opposed to my scraps for that eventual quilt bag), then it occurred to me that the cuffs would be perfect for buttons, trims, and all of those flower tutorials I've been working on.
Things you will need
Shirt cuff, cut below the seam
Buttons
Trims
All those fabric flowers you've been making
Iron-on patches
Thread, needles
Any other shinies; like studs, rhinestones, pins, charms, and whatnots
 |
| A pile of loverlies! |
 |
| Another shot of my pile |
 |
| The 1st bag is the closest to Steampunk: it has patches with retro photos and buttons with gear shapes. Bag 2 is more pretty punk with classic tats, zipper flowers and grommets. Bag 3 is pretty and lacy, I want it to look a little like a wild west garter. Bag 4 is today's cuff! |
 |
| I've ironed on the yellow rose, the button hole is directly to the left of it. |
 |
| Choosing buttons is so difficult!!! |
Arrange the rest of your goodies! I added trim and a rose tutorial from either Sassy Scrapper or Little Birdie Secrets. You'll likely be seeing homemade blossoms on all of these. I also sewed on some trim, a leaf for the flower, several buttons and a pin and voila it's done!
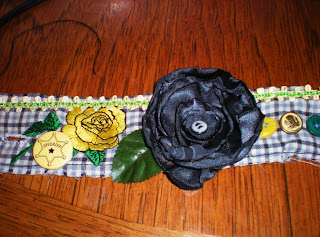 | |||||||||
| Yellow and black are a nice combo! |
 |
| One view of the upcycled cuff. |
 |
| The obverse. Clearly, there's a new sheriff in Craft Town! |
Very striking and very cute! What a creative woman you are--and a good writer, as well.
ReplyDelete