Showing posts with label beads. Show all posts

Monday, December 20, 2010

No-Sew Fabric Origami Crane Ornaments - Tutorial

In my earlier post about the Chinese take-out box, I mentioned my past work creating origami cranes in fabric. It's an easy no-sew project with some stiff interfacing, fabric remnants - holiday themed, if, like me, you like to give these as ornaments - and a good steam iron. I thought I would share my FabriCrane technique, for easy last-minute gifting.

My photos begin a little after the first step, which is to select a length of fabric - fat quarters are good - and to fuse a stiff interfacing to the wrong side.

Next, you want to cut your fabric into precise squares. A rotary cutter, mat and ruler are essential for this to be exact. I've found that a 7" square is just about the bare minimum at which this technique can be successful.

So, now you have your 7" square. What next? It's time to paper-fold some fabric. It helps if you are familiar with the basic technique for folding origami cranes. If not, read through the link above, and then follow along. All will become clear.

You want to press in interfacing-together creases in the middle of all sides. This means your right-side fabric will be facing outward.

Then, press in a diagonal crease with interfacing sides in and fabric sides out.

Next, press in a diagonal crease in the opposite direction with interfacing sides out and fabric sides in.

You should see something like what appears below.


Fold the inward-facing creases on the right side in their natural direction and press again. You should get something that looks like this.


Now, starting where the points of the raw edges meet, open out the fabric to create what origami enthusiasts call the "canoe" shape.


Make the edges and corners meet as precisely as you can, and press.


Do the same on the other side of your original square. You should have something that looks like this:


Now it's time to begin forming the neck, head and tail. Take the edges of your "canoe" that are open, and fold them in to meet the prior raw edge. Press. Then do the same thing on the other side, for a result that looks like this:


Here's the tricky bit. You need to take the two sides you just pressed and fold them back on themselves, into the void between the two crane "wings" you've just created. Press one, and then the other, for this result:


From here, choose which side to form the crane's beak from, and which the tail. If you need to trim fiddly bits where too much interfacing shows, use a small pair of embroidery scissors. Press the result into place.


Now that all the folds are complete, it's time to give your crane dimension. Grasp one of the "wings" in one hand, the other in your other hand, and gently pull apart. You will see your crane begin to take shape.


Press down slightly on the "boxy" section that forms the core of the crane's body. This "inflates" it so that the whole becomes structurally stable.

Now you need to find a way to hang your crane. You could certainly do a simple fabric loop, but, as a beader, I like to add some wirework to the mix.

I start by using my jewelry tools to cut a length of wire at minimum 12" in length. Using freeform techniques or coiling tools, I make about 2/3 of it into a spiral shape. If you intend your cranes for Christmas ornaments, the looser the spiral, the better.


The next step is to use either a sharp darning needle or a tailor's awl to poke a pilot hole in the top of the "box" shape you created when forming the crane.


Insert your coiled wire through the pilot hole, coil upwards. The fold leaves a natural hole on the bottom, so there's no need for another poke.


Now you need some way to stop the crane from sliding right off the bottom of the wire. My answer? Beads!


After making sure you have a nice right-angle in your wire after the spiral, and determining that you like where the crane will end up as the beads stop its descent, add whatever beads you wish as a dangle, finishing with a coiled loop for safety to close off the work.


Behold! Your finished crane is done and ready to fly on your holiday tree!


FabriCranes can be used as more than ornaments - as decorative mobiles, or to adorn holiday wreaths. And you need not stop at just the fuse-and-press stage - you can certainly embellish finished FabriCranes with beads, trims and more.

A few helpful hints:

The pressing process is...well, steamy, especially since the maximum steam setting is most effective in setting the folds (if your iron has a shot-of-steam function, definitely use it). I have found that it's useful to prepare several FabriCranes to the initial square stage at once, so that you can move in sequence from one to another, working efficiently whilst sparing your fingers from handling too much hot fabric.


While you could indulge in Fray-Check on the edges, I've found it's largely unnecessary.

Happy FabriCraning, everyone! I hope at least a few of Magpie Shinies' readers will have a flight sailing on their trees this season, and that you'll all pass the technique and the message along in the service of Peace On Earth.

Sunday, November 21, 2010

Auction Goodies On Offer

I'm cross-posting this from Facebook and also from the site on which Kimberlee and I first "met" before we had the pleasure of meeting in person: the Fox News watchdog site News Hounds and its companion Forum. Earlier in the decade we routinely conducted informal holiday auctions of regular readers' and contributors' arts and crafts to raise money to support the volunteer-run site. After a couple of years off, the custom has returned!

Magpie Shinies visitors are all cordially invited to visit the public Facebook album hosting our auction here. The auction has just begun, but we already have a couple of beaded items from me and also some beautiful prints of original paintings by another of our regulars. I daresay we will see, if not specific items from Kim, perhaps the opportunity to commission something from her? New items will be posted as they come in, so check back often. If you see anything that you would like to place a bid on, just read the instructions in the caption to the first image in the album - the "title card" - for the details.

I realize our process is a little more informal and clunky than, say, Etsy or eBay. News Hounds really does run on a shoestring, though, and we wanted to try for an approach that depends on no more investment than the creativity of the donors and the human energy required to administer the project.

Finally, here's one of my first items on offer, to whet your appetite! I have plenty of furnace glass in my bead stash, thanks to last year's Tucson show, so maybe I'll make another one and turn it into a tutorial!


Hope to see you at the auction.

Thursday, November 4, 2010

My Crafting Space

One of my big agenda items when we began house-hunting in Canada five years ago was to find a place with enough space for an office area that didn't take up what my husband called "his half" of the kitchen island, and for a sewing/crafting space that didn't have to be crammed into a spare bedroom, and that might even be able to accommodate an actual sewing cabinet, so for a change I wouldn't have to sit on the floor to sew and use my knee on the foot pedal.

Fortunately for us, what are known as "legal suites" are popular in British Columbia. These are separate, usually basement areas which are set up so that they can be outfitted as an apartment complete with living area, kitchen, bath and bedroom. Primarily rented to students, they are a great way to supplement your income or help with your own mortgage. The house we found had one such fantastic space. Drywall was already up everywhere but the ceiling, and plumbing was in place too. Even when we looked at it with the bare concrete floor, I immediately envisioned the home office, library, and teen "lair" that would fill the space, and I claimed what would have been the kitchen as my forthcoming studio.

Job one was to get the flooring down. We opted for a woodgrain laminate that husband did a beautiful job of laying down, and I took care of the baseboards. But I hadn't exactly been lazy in the meantime - working from a copy of the original house blueprints and Lynette Ranney's Dream Sewing Spaces, I'd already begun planning.

More than sewing needed to be accommodated. As a quilter, a knitter and a beader...and a rubber-stamper and wheat-weaver and embroiderer and miniaturist and so on...it wasn't just a lifetime's accumulation of fabric that needed a home: it was also yarn, beads, notions, quilting stencils, and books on all of the above. So I began by portioning out the space as logically as I could, with dedicated areas and an eye toward making the most of each and every storage opportunity.

My original idea was to outfit the space with standard kitchen cabinetry, on the theory that this would make it easier to sell the place when we eventually downsize. But even with a discount cabinet warehouse just a few blocks away, this proved to be cost-prohibitive, and not an approach that would get me up and running smartly.

Instead, I opted for pre-fabbed closet units by Debbie Travis that were on sale at Canadian Tire. Shipping from Ontario took forever thanks to a snowstorm, but once they arrived the units were easy to assemble and position around the walls in a free-standing perimeter.


The shelves - with doors to minimize the clutter - would provide cabinet space big enough to handle larger lengths of fabric,


and the drawers would allow me to finally organize my smaller quilting pieces.


Open spaces between allowed for easy storage of button tins, embroidery threads, craft paints and rubber stamps.


I was even able to take advantage of an electric outlet that had been positioned to be at countertop height as a break between units, for hanging ironing board storage. (It's also handy for cord control when I'm pressing, versus a floor outlet.)


In addition to a separate organizer of wire baskets, yarn storage is easily handled in baskets on top of the units.

It was a wonder to actually be able to unpack and organize all my fabrics by type, in a way such that I could see all of them at a glance! For the first time EVER that I can recall, I don't have any of my fabric buried in a cardboard box somewhere.

I lucked out in terms of sewing furniture, too. A local sewing centre offered not only the perfect sewing cabinet (though mine has the drawers on the left, the door storage on the right, and a larger fold-out area at the back for quilting)

but also a splendid cutting table! It's usually open in my space (right now the Georgian Manor dollhouse is on it, though it will move to the folding table shortly for electrics to be taken care of), but can easily fold down if not in use, and the sliding sections and drawers house my fabric embossing stamps, a quilt in progress, quilting stencils and cutting mats, plus odds and ends of miscellaneous projects.

And, then, there were the beads. Small items, but still a big storage need. I ended up finding a solution at Best Craft Organizer when one of their two-pedestal crafters' desks went on sale at 50% off. It turned out that they were just across the Straits in Vancouver, so the components arrived in no time!


The dividers work equally well for vials of Japanese delicas and loose beads


and for sorting findings by type and accommodating strands.


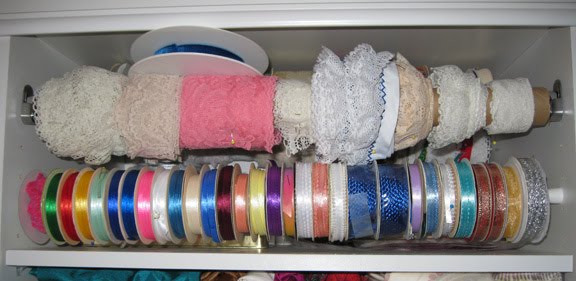
Existing shelves took care of the growing library of craft books. What were intended as hanging rods in the closet organizers gave spools of lace an organized home, and narrow tension-based curtain rods did the same thing for ribbons.


Other miscellaneous trims found homes in tiered hanging baskets, once the ceiling drywall and painting was complete.


The organizer my husband brought me long ago from a trip to Japan lives on the wall behind my sewing cabinet, next to the small computer desk that houses the old PC and the inkjet printer (for projects that require printing on fabric, and for access to my old quilting software).


Another free space is home to sewing-themed artwork and a couple of cross-stitch pieces.


Finally, it came time to pull it all together. I'd left a space between units which I filled in with two blanket chests painted white. One of these contains interfacing, and the other quilt batting. Project Runway themed fabric cushions turn it into a cozy window seat for planning the next creation.


More fabrics from the same collection became valances and were turned into cushions for the two stools that are perfect cutting-table height (using halves of zippers for the ties!)


and to slipcover the task chair I've had forever.


The finished result honestly is the crafting space I've always imagined, with a place for everything and - almost - everything in its place!


Thanks for the post idea, Kimberlee! I can't wait until you come for a visit and we can disappear in here for fabric playtime!

Monday, October 18, 2010

More Shiny Than Sew-y

I guess I lied. I did intend to post on my next sewing project. Then I got busy shingling the dollhouse roof, and turned back to an ongoing bead project while the glue was drying (has to cure overnight before I can do anything more with it, anyway). So, tonight, my head's full of the sparkly and the shiny and the pretty little wonders that are beads.

This is the project I've been working on tonight - a reversible cat-face amulet bag in peyote stitch. I stopped just at the point of dividing for the ears. (This is an earlier shot - I'll post the finished weave when it's done.) It's just such a joyous process, row by row seeing the design emerge. I loved the moment when those beautiful blue and green eyes, respectively, were complete and gazing at me.


I can't remember a time when I haven't been messing about with beads - from the "Indian Bead Loom" I made friendship bracelets on as a kid, or learning from my mom how to use wire and bugle beads to make rings, right on to using them as costume embellishment.

But it was bead-weaving that really first spoke to me, as an adult. Like pointillist painting, but in a shinier medium, you might say. I started with Sigrid Wynne-Evans' brick stitch earrings, and then became fascinated by peyote stitch and Amy Loh-Kupser's designs, like this polar bear amulet.


From there it was on to dimensional pieces...


And, more recently, tiny beaded books that actually open, based on Maxine Peretz Prange's instructions but my own charted designs (using a terrific shareware program called BeadTool).


I guess part of the appeal is that it's almost like having the chance to weave your own fabric (though, oddly, my interest in weaving never went further than those loop-based potholder looms...).

No, who am I kidding? It's all about the glitz and the "ooh-ahh" moments when you confidently say to someone. "This? Oh, I made it..."

Sewing next time. I promise!