Magpie Shinies readers will remember that a few months ago I shared some of the fabrics that were going to become upholstery and other soft furnishings in the inch-to-the-foot scale Georgian Manor House which is the craft project looming largest in my life right now.

Well, with what we'll call a "budgetary lull" preventing me from doing any big things like flooring or lighting for a while, I thought I'd finally break out some of those old House Of Miniatures kits that I'm reworking for the bulk of the remaining furnishings. At pennies on the dollar they'll allow me to furnish the house in the style it deserves, but on the cheap compared to store-bought new miniatures for All. Those. Rooms.
In the process I discovered a terrific approach that I thought merited a tutorial, since it's a technique that I think has many potential uses beyond building miniature furniture.
A little history: House Of Miniatures, and indeed dollhouse miniatures as a hobby, peaked in the late 1970s and early 1980s. They had a full line of furniture kits from simple nightstands and tables to elaborate hutches and fully upholstered chairs.

You'll remember I declared that I was going to replace their default fabrics with some beautiful bits of silk I'd acquired, as indeed I did with my first upholstery effort, this Chippendale wing chair.

Because, there's no comparison between those results and what it would have looked like had I gone with the plain, drab blue cotton that came with
every kit.

The project I'll document is the complementary Chippendale sofa. The first step is to press the fabric thoroughly with your steam iron.

Next, I'll apply fusible web - such as Heat-N-Bond - to the reverse of the silk.

In this case I started with one section, but ended up having to apply fusible to the whole length in order to meet the "seam allowances" for everything required. Be sure to set your iron to DRY for this process.

When cooled, peel away the paper backing and you'll see where your web, just like the wrong side of fusible interfacing, is ready to attach your fabric to whatever you need.

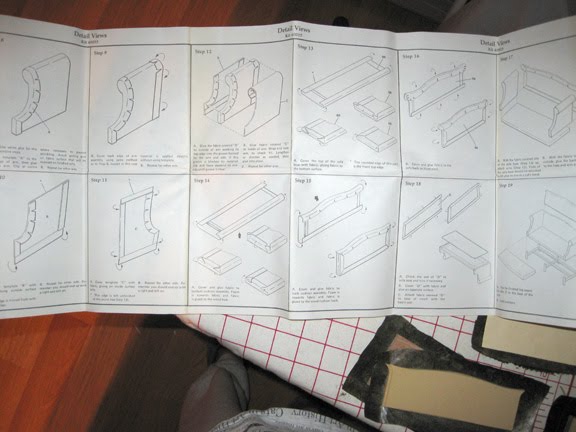
Next, I consult the part layout provided in the instructions and identify all my pieces, both the wooden structures and the cardstock cutouts that make short work of some of the more delicate bits.

The kits requiring upholstery include foam for the cushions, usually glued to a wooden base. In cases where the contents seem to have deteriorated too far to be reliable - remember, most of these kits are 30+ years old already, probably stashed forgotten in someone's attic until rescued and popped on eBay - I re-cut new foam from materials you can find at any Michael's or similar craft supply, but since these look well-preserved I'll go ahead and apply them as instructed. I
do add another step of my own before I actually cover them...but I'm getting ahead of myself.

Now I take all my pieces that require covering with fabric and lay them out on the fabric + fusible web length, identifying the optimal position for each to economize on the fabric but still ensure I have enough allowance for the wrap-arounds required.

The next step is to cut them all out. In the instructions it will tell you to glue the cardstock templates, specifically, to the fabric. This is one of the steps that the magic of fusible web allows me to avoid for everything but the smallest pieces like the front of the sofa's roll-arms, to which I apply just the
tiniest dab of glue to hold the template in place for cutting.

Now, cutouts complete - to the instructions! Back in the 80s, this would all be about the glue, glue, glue: apply the fabric templates to the parts, clip curves where you need to, and then find some kind of creative way to hold it down and WAIT FOR IT TO DRY. It would take forever...probably why the only kits I ever constructed before this were all wood and no upholstery. Contrary to popular opinion, I'm not very patient at all.

But it's 2011, and I have fusible web on my fabric. I knew, from past experience making fabric-covered puzzle boxes, that it could easily and tidily bond fabric to cardboard. So, I thought it stood to reason...why not to lightweight wood?
Job one is to break out my hand-held craft iron. You can't do close work like this with a full-sized iron, but a craft iron like this one from Clover - essentially a flat-paddled soldering iron with an adjustable temperature control - is perfect for this scale of project. Two important caveats for a tool like this: one, be sure to use the supplied stand to rest it on when not in use, or it will burn through your ironing board cover just as surely as your full-sized iron would; and, two, be
very careful of your fingers whenever you need to hold down bits of fabric as you apply the iron for fusing.

I'll start with the fiddliest bit: the tops of the roll arms. A little glue attaches the lightly pre-glued template + fabric to the arm, and I hold it precisely in position.

Starting in the middle of the curve, I fuse the clipped edges to each side of the arm to hold them more or less in place while I continue the fusing process. In general I've found it works best to fuse the clipped curves first, before the straighter edges. It works brilliantly....and the best part is, I don't have to go and do something else for a few hours while waiting for glue to dry! Once the fabric and wood cool - a matter of moments - I can continue working with the same piece and move on to the next step. (Apologies for the blurry photo.)

The back of the arm is even easier. I can fuse the template - all fabric + web, no cardstock - directly
to the wooden element before I start on the curves! No muss, no fuss, and wonderfully clean results, with sharp lines and no bleed-through from using too much glue.

For the larger cardstock templates, I begin by using the hand iron to fuse the fabric thoroughly to the cardstock, fabric side up. Be sure to do this right in the center of the template and leave the edges for later, or you'll risk fusing your piece to your ironing board.

When it's time to fuse the foam-covered "cushions," I want them to be a little less spartan than the original, so I add one layer - only one! - of lightweight quilt batting. I find this gives me the "cushier" look I want without adding so much bulk that the components, which really are very precise, no longer fit together well.

After a couple of hours' work, all the components have been fully fused and are ready for assembly - a much quicker, simpler and more precise job than it would have been back in a glue-based world.

And at the end of my evening's project, all that remains for the next day is to finish the legs and glue the upholstered sofa to the base.

A few general hints for working with fusible web, if you haven't before:
- Sometimes, especially when you're adhering fabric to another bit of fabric that's already been folded over and fused, the bond doesn't want to immediately "take." Apply some pressure to the desired point with your fingertips until the fabric cools a bit, and the bond will usually hold.
- For cardstock templates, pre-clip to the edge of the cardstock for your curves. When working on wooden assembly pieces, first fuse your fabric to the wood, and then clip as you go.
- Keep any extra bits. You may have dining chairs or benches you want to upholster to match, later on - I know I do!
- Don't put the craft iron away when you're done with a project like this. They're very handy when you want to achieve a really precise point on a collar or a cuff.
I've been busy with soft furnishings for the Manor, too - next time, I'll share with you some of my results in a non-tutorial gallery!