One of my big agenda items when we began house-hunting in Canada five years ago was to find a place with enough space for an office area that didn't take up what my husband called "his half" of the kitchen island, and for a sewing/crafting space that didn't have to be crammed into a spare bedroom, and that might even be able to accommodate an actual sewing cabinet, so for a change I wouldn't have to sit on the floor to sew and use my knee on the foot pedal.
Fortunately for us, what are known as "legal suites" are popular in British Columbia. These are separate, usually basement areas which are set up so that they can be outfitted as an apartment complete with living area, kitchen, bath and bedroom. Primarily rented to students, they are a great way to supplement your income or help with your own mortgage. The house we found had one such fantastic space. Drywall was already up everywhere but the ceiling, and plumbing was in place too. Even when we looked at it with the bare concrete floor, I immediately envisioned the home office, library, and teen "lair" that would fill the space, and I claimed what would have been the kitchen as my forthcoming studio.
Job one was to get the flooring down. We opted for a woodgrain laminate that husband did a beautiful job of laying down, and I took care of the baseboards. But I hadn't exactly been lazy in the meantime - working from a copy of the original house blueprints and Lynette Ranney's
Dream Sewing Spaces, I'd already begun planning.
More than sewing needed to be accommodated. As a quilter, a knitter and a beader...and a rubber-stamper and wheat-weaver and embroiderer and miniaturist and so on...it wasn't just a lifetime's accumulation of fabric that needed a home: it was also yarn, beads, notions, quilting stencils, and books on all of the above. So I began by portioning out the space as logically as I could, with dedicated areas and an eye toward making the most of each and every storage opportunity.
My original idea was to outfit the space with standard kitchen cabinetry, on the theory that this would make it easier to sell the place when we eventually downsize. But even with a discount cabinet warehouse just a few blocks away, this proved to be cost-prohibitive, and not an approach that would get me up and running smartly.
Instead, I opted for pre-fabbed closet units by Debbie Travis that were on sale at Canadian Tire. Shipping from Ontario took forever thanks to a snowstorm, but once they arrived the units were easy to assemble and position around the walls in a free-standing perimeter.

The shelves - with doors to minimize the clutter - would provide cabinet space big enough to handle larger lengths of fabric,

and the drawers would allow me to finally organize my smaller quilting pieces.

Open spaces between allowed for easy storage of button tins, embroidery threads, craft paints and rubber stamps.

I was even able to take advantage of an electric outlet that had been positioned to be at countertop height as a break between units, for hanging ironing board storage. (It's also handy for cord control when I'm pressing, versus a floor outlet.)

In addition to a separate organizer of wire baskets, yarn storage is easily handled in baskets on top of the units.

It was a wonder to actually be able to unpack and organize all my fabrics by type, in a way such that I could see all of them at a glance! For the first time EVER that I can recall, I don't have any of my fabric buried in a cardboard box somewhere.
I lucked out in terms of sewing furniture, too. A local sewing centre offered not only the perfect sewing cabinet (though mine has the drawers on the left, the door storage on the right, and a larger fold-out area at the back for quilting)

but also a splendid
cutting table! It's usually open in my space (right now the Georgian Manor dollhouse is on it, though it will move to the folding table shortly for electrics to be taken care of), but can easily fold down if not in use, and the sliding sections and drawers house my fabric embossing stamps, a quilt in progress, quilting stencils and cutting mats, plus odds and ends of miscellaneous projects.
And, then, there were the beads. Small items, but still a big storage need. I ended up finding a solution at Best Craft Organizer when one of their two-pedestal
crafters' desks went on sale at 50% off. It turned out that they were just across the Straits in Vancouver, so the components arrived in no time!

The dividers work equally well for vials of Japanese delicas and loose beads

and for sorting findings by type and accommodating strands.

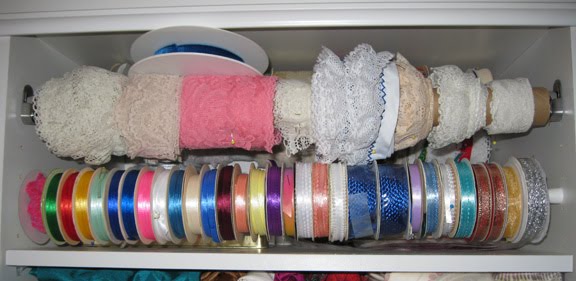
Existing shelves took care of the growing library of craft books. What were intended as hanging rods in the closet organizers gave spools of lace an organized home, and narrow tension-based curtain rods did the same thing for ribbons.

Other miscellaneous trims found homes in tiered hanging baskets, once the ceiling drywall and painting was complete.

The organizer my husband brought me long ago from a trip to Japan lives on the wall behind my sewing cabinet, next to the small computer desk that houses the old PC and the inkjet printer (for projects that require printing on fabric, and for access to my old quilting software).

Another free space is home to sewing-themed artwork and a couple of cross-stitch pieces.

Finally, it came time to pull it all together. I'd left a space between units which I filled in with two blanket chests painted white. One of these contains interfacing, and the other quilt batting.
Project Runway themed fabric cushions turn it into a cozy window seat for planning the next creation.

More fabrics from the same collection became valances and were turned into cushions for the two stools that are perfect cutting-table height (using halves of zippers for the ties!)

and to slipcover the task chair I've had forever.

The finished result honestly is the crafting space I've always imagined, with a place for everything and - almost - everything in its place!


Thanks for the post idea, Kimberlee! I can't wait until you come for a visit and we can disappear in here for fabric playtime!