Monday, November 1, 2010

Awesome Find - DIY Couture

http://www.diy-couture.co.uk

I found this amazing sewing project and cannot let go of how awesome of an idea it is.  DIY produces booklets and lots of computer support so you can create your own full wardrobe.  The designs are made for the novice, and each basic design offers several variations on each basic design.  From their Facebook:


DIYcouture make how-to instruction books that help people to sew their own clothes from scratch. The books are for people who would like couture clothing without the couture price tag and affordable clothing that has not been produced using sweatshop labour.

The books are fully comprehensible to even the novice seamster, guiding the sewingly-challenged through the making journey with photographs and full colour diagrams.

The books provide people with the capacity to add their own shape and ideas to a design, allowing them to escape the one-size-fits-all of high street fashion.


Ordering the booklets in the US costs about as much as your average pattern booklet, and the designs are really beautiful.  Check it out!

Friday, October 29, 2010

Inside the Magpie Nest - a Wristcuff Tutorial

by Kimberlee

The Magpie has always been kind of like my totem animal, and like the magpie, I'm obsessed with bits and pieces of shiny ephemera.  This means, of course, that I'm also obsessed with beautiful boxes to put my Shinies
into.  Sometimes I gather all the little boxes around me and think, "What should I do with all these beauties?"

The answer for some of my Shinies came in the form of another upcycle I've been working on, fusing several old flannel shirts into a dress.  I had cut the cuffs off the shirt, and of course stuffed them into my current "too big or nifty" basket (as opposed to my scraps for that eventual quilt bag), then it occurred to me that the cuffs would be perfect for buttons, trims, and all of those flower tutorials I've been working on.

Things you will  need


Shirt cuff, cut below the seam
Buttons
Trims
All those fabric flowers you've been making
Iron-on patches 
Thread, needles
Any other shinies; like studs, rhinestones, pins, charms, and whatnots


A pile of loverlies!
 Sort out your beauties into piles of coordinating stuff.  It can be by color, style, mood, or whatever floats your boat.  I wish I had some Steampunk things, that would make a cool cuff!

Another shot of my pile
I have 4 cuffs from 2 different shirts, so I sorted my things that I might want on each cuff into ziplock baggies.
The 1st bag is the closest to Steampunk: it has patches with retro photos and buttons with gear shapes.  Bag 2 is more pretty punk with classic tats, zipper flowers and grommets.  Bag 3 is pretty and lacy, I want it to look a little like a wild west garter.  Bag 4 is today's cuff!
 Lay out everything in your bag, and don't forget to iron it!  Play around with the placement of the stuff in the bag. I suggest adding something permanent to work around.  Remove the button because you will probably have a button you are dying to use instead.


I've ironed on the yellow rose, the button hole is directly to the left of it.
Pick out the buttons you will use as closure.  You may have to change the button hole to accommodate your buttons.  I also added a second button hole so 2 buttons would show when I was wearing it.

Choosing buttons is so difficult!!!

 Arrange the rest of your goodies!  I added trim and a rose tutorial from either Sassy Scrapper or Little Birdie Secrets. You'll likely be seeing homemade blossoms on all of these.  I also sewed on some trim, a leaf for the flower, several buttons and a pin and voila it's done!

Yellow and black are a nice combo!    


.
 My only regret is that I should have loaded it up more, but since this was my first, I was a little gun-shy.  I'll post the others as I make them, and they'll  be more elaborate!
One view of the upcycled cuff.

The obverse.  Clearly, there's a new sheriff in Craft Town!

Tuesday, October 26, 2010

Give-Aways

Win this lovely Forever After Dress from Grosgrain.  It's truly gorgeous!

Craftster's Costume Contest.

Gift Tags and Beautiful Earrings on Krishenka's Beautiful Treasures.

Fat Quarters on Clearly Tangled!

Thursday, October 21, 2010

Failure and Re-Group

I've been dealing with project failure lately, and it stinks.  I was trying to made the Dress from B3598, which Butterick had marked as "easy" and I had foolishly approached as such, using my beloved Groovy Jersey fabric that I had been holding onto for a long time.  I measured it and everything. And I just tried to upload a photo, but the blog isn't cooperating.  It's probably for the best, as now I can't link to a series of photos of my massive failure.  ANYWAY, I thought I had measured enough BUT I only had enough for the front, back and ONE yes ONE sleeve.  I really wanted the long sleeves.  :(  So I thought, "Why not cut the dress shorter, make the bottom out of black fabric, and have enough for 2 sleeves??"

So I again cut my pretty fabric to have enough for sleeves, and sewed on a black jersey to the bottom.  I was feeling pretty good about all this, but after I laid it out, it looked....well, ugly. I don't even have a photo of it!  I thought, "Well, I'll sew it anyway and see if I have something to work with.  And I wish I had just cut the great fabric longer and turned it into a tunic!"  Then, the unheard of happened...the machine ATE it, like, sucked it into the bobbin.  I had to cut it out of the machine!

Sooo angry.  I haven't been able to make a garment since the Ren Dress.

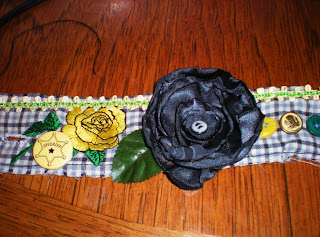
I took a step back and a deep breath, and decided to reorganize.  I have several projects started that I need to finish - a faux leather belt, a vinyl purse, and a re-purposed flannel shirt dress.  I've been meaning to teach myself how to make cloth flowers.  I hate working with pattern tissue!  I wanted to make wrist bands!

The flowers have been fun, I've been mixing at matching little bundles of fabric, and I am going to use some of them to make wrist bands.

I'm using the wrist cuffs off the afore-mentioned flannels, they are just the right size, and they have a built in button-hole, which is plus.

Also as I mentioned, I hate working with tissue paper, so I decided to affix some of my patterns.  I used watered down white glue, craft paper and a large brush.  You only have to coat the top of the tissue, as it soaks through to the craft paper.  Be careful and watch for bubbles, and when it dries it is AWESOME.  Just cut around the lines and you're done.  I mark the pattern number and what it is on the outside of the roll, and tie a clip onto the tying cord to hold the smaller pattern pieces.
Pre-cut patterns.


I'm getting pretty good at the rosettes, too.  More complicated flowers to follow soon!

So I am not quite sure where to go next - jump into a project, do some of this smaller prep-work, or what.  Any ideas?


Monday, October 18, 2010

More Shiny Than Sew-y

I guess I lied. I did intend to post on my next sewing project. Then I got busy shingling the dollhouse roof, and turned back to an ongoing bead project while the glue was drying (has to cure overnight before I can do anything more with it, anyway). So, tonight, my head's full of the sparkly and the shiny and the pretty little wonders that are beads.

This is the project I've been working on tonight - a reversible cat-face amulet bag in peyote stitch. I stopped just at the point of dividing for the ears. (This is an earlier shot - I'll post the finished weave when it's done.) It's just such a joyous process, row by row seeing the design emerge. I loved the moment when those beautiful blue and green eyes, respectively, were complete and gazing at me.


I can't remember a time when I haven't been messing about with beads - from the "Indian Bead Loom" I made friendship bracelets on as a kid, or learning from my mom how to use wire and bugle beads to make rings, right on to using them as costume embellishment.

But it was bead-weaving that really first spoke to me, as an adult. Like pointillist painting, but in a shinier medium, you might say. I started with Sigrid Wynne-Evans' brick stitch earrings, and then became fascinated by peyote stitch and Amy Loh-Kupser's designs, like this polar bear amulet.


From there it was on to dimensional pieces...


And, more recently, tiny beaded books that actually open, based on Maxine Peretz Prange's instructions but my own charted designs (using a terrific shareware program called BeadTool).


I guess part of the appeal is that it's almost like having the chance to weave your own fabric (though, oddly, my interest in weaving never went further than those loop-based potholder looms...).

No, who am I kidding? It's all about the glitz and the "ooh-ahh" moments when you confidently say to someone. "This? Oh, I made it..."

Sewing next time. I promise!

Friday, October 15, 2010

My First Muslin AND First Darts

by Kimberlee
 I've been terrified by one of my patterns that I've also been dying to make, Simplicity 2444.  I haven't been sewing that long, about a year, and I only made my first dress about a month ago, but I've had the pattern for A WHILE now, back to when I used my archaic New Home/Janome machine.  Did you know that only one place in the entire US carries parts for this type of machine, and it's in California?  Yeah, me neither until it broke.  Which is ok because it weighed about 25 lbs and didn't even have a reverse setting.

Anyway, one of the reasons I was so scared of the pattern was the presence of darting in the bodice, but I shouldn't have been.  I also am so relieved I chose to do a muslin of this dress!  I killed two birds with one stone (not that I would, I love birds) by getting a jump start on the apron I've been wanting to make and discovering that the pattern I was using would be a little too snug for me.
 Don't say you haven't ever used a chair as a dress form.


Fairly well made darts, not bad for the first time.

So that's it!  Next time, I'll try not to be so afraid of trying a new trick!  It's only sewing, after all.

Sundries and Plunder Guest Giveaway

Check out Grosgrain (a blog I follow religiously!) for this amazing mask give-away. These would look amazing in a wall of any room.

Sundries and Plunder Guest Giveaway

"Sundries and Plunder is run by two sisters from Oregon, one living in Portland, and the other in Bend. Between being raised by creative parents, and the need to stay entertained during the Pacific Northwest's long rainy season, it was probably inevitable that the two would become two insatiable crafters."