Showing posts with label gifts. Show all posts

Saturday, April 16, 2011

HELP ME with the Prettiest Grab Bag Fabric Ever

by Kimberlee

One of my best friends and blog mate Eileen (Ralphy Fan) has an uncanny ability to find beautiful and unique fabrics, notions and other doodads.  As you've seen from her posts here, she has an amazing eye and talent, and works in that wonderful space where art and craft marry.  And, a few year ago, she made me a She-Ra costume for Halloween!


Oh yes, I DO have the power!


She is also an amazing quilter, and knows that I want to learn how to quilt, though I'd rather go for something free-form and less precise, and I also get the hot sweats when trying to pick out coordinating fabric. 

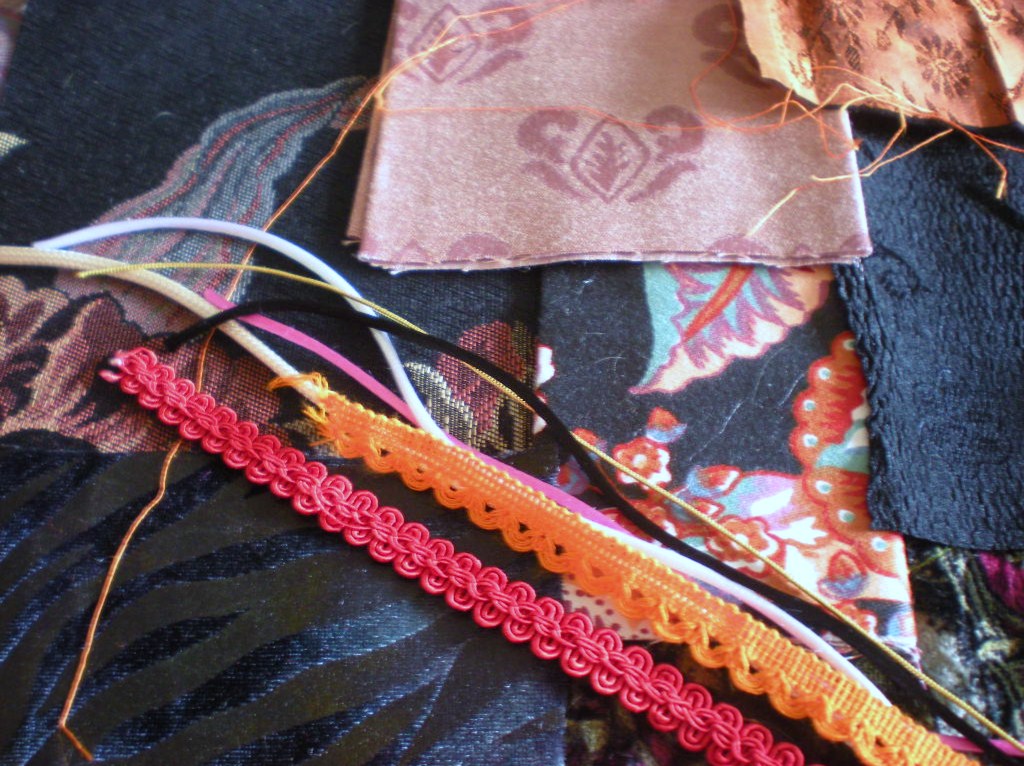
So she sent me this lovely Grab Bag from Mostly Silk, operating out of Vancouver.  Here's my package


Aren't the fabrics and notions gorgeous?  I love laying them out and looking at them.  But I have no idea what to do from here - I can't just start cutting.  I want to do something that relies less on precision cutting and more on some sort of quilt impressonism.

So what I wanted to know from you, my lovely readers, is if you have any suggestions, preferably with links, for what I can do.  I need a LOT of handholding on this one.  Eileen, this would be MUCH EASIER if you were here helping me with this, I bet we'd have something gorgeous knocked out and be halfway done with my clothing projects, too.  I've never sewed with anyone else, that sounds so fun!

So thank you in advance for ANY suggestions, sites, links, patterns, etcs you have.  Remember that my experience is exactly zero, though I do know how to sew, which is a plus I hope?

OH!  And I just wanted to remind you that we STILL HAVE A GIVEAWAY, so please enter.  You don't even have to Fan Up to do it!  Please come on over and leave a comment.

No thumbs, and I'm STILL better at French Knots...

Monday, December 20, 2010

No-Sew Fabric Origami Crane Ornaments - Tutorial

In my earlier post about the Chinese take-out box, I mentioned my past work creating origami cranes in fabric. It's an easy no-sew project with some stiff interfacing, fabric remnants - holiday themed, if, like me, you like to give these as ornaments - and a good steam iron. I thought I would share my FabriCrane technique, for easy last-minute gifting.

My photos begin a little after the first step, which is to select a length of fabric - fat quarters are good - and to fuse a stiff interfacing to the wrong side.

Next, you want to cut your fabric into precise squares. A rotary cutter, mat and ruler are essential for this to be exact. I've found that a 7" square is just about the bare minimum at which this technique can be successful.

So, now you have your 7" square. What next? It's time to paper-fold some fabric. It helps if you are familiar with the basic technique for folding origami cranes. If not, read through the link above, and then follow along. All will become clear.

You want to press in interfacing-together creases in the middle of all sides. This means your right-side fabric will be facing outward.

Then, press in a diagonal crease with interfacing sides in and fabric sides out.

Next, press in a diagonal crease in the opposite direction with interfacing sides out and fabric sides in.

You should see something like what appears below.


Fold the inward-facing creases on the right side in their natural direction and press again. You should get something that looks like this.


Now, starting where the points of the raw edges meet, open out the fabric to create what origami enthusiasts call the "canoe" shape.


Make the edges and corners meet as precisely as you can, and press.


Do the same on the other side of your original square. You should have something that looks like this:


Now it's time to begin forming the neck, head and tail. Take the edges of your "canoe" that are open, and fold them in to meet the prior raw edge. Press. Then do the same thing on the other side, for a result that looks like this:


Here's the tricky bit. You need to take the two sides you just pressed and fold them back on themselves, into the void between the two crane "wings" you've just created. Press one, and then the other, for this result:


From here, choose which side to form the crane's beak from, and which the tail. If you need to trim fiddly bits where too much interfacing shows, use a small pair of embroidery scissors. Press the result into place.


Now that all the folds are complete, it's time to give your crane dimension. Grasp one of the "wings" in one hand, the other in your other hand, and gently pull apart. You will see your crane begin to take shape.


Press down slightly on the "boxy" section that forms the core of the crane's body. This "inflates" it so that the whole becomes structurally stable.

Now you need to find a way to hang your crane. You could certainly do a simple fabric loop, but, as a beader, I like to add some wirework to the mix.

I start by using my jewelry tools to cut a length of wire at minimum 12" in length. Using freeform techniques or coiling tools, I make about 2/3 of it into a spiral shape. If you intend your cranes for Christmas ornaments, the looser the spiral, the better.


The next step is to use either a sharp darning needle or a tailor's awl to poke a pilot hole in the top of the "box" shape you created when forming the crane.


Insert your coiled wire through the pilot hole, coil upwards. The fold leaves a natural hole on the bottom, so there's no need for another poke.


Now you need some way to stop the crane from sliding right off the bottom of the wire. My answer? Beads!


After making sure you have a nice right-angle in your wire after the spiral, and determining that you like where the crane will end up as the beads stop its descent, add whatever beads you wish as a dangle, finishing with a coiled loop for safety to close off the work.


Behold! Your finished crane is done and ready to fly on your holiday tree!


FabriCranes can be used as more than ornaments - as decorative mobiles, or to adorn holiday wreaths. And you need not stop at just the fuse-and-press stage - you can certainly embellish finished FabriCranes with beads, trims and more.

A few helpful hints:

The pressing process is...well, steamy, especially since the maximum steam setting is most effective in setting the folds (if your iron has a shot-of-steam function, definitely use it). I have found that it's useful to prepare several FabriCranes to the initial square stage at once, so that you can move in sequence from one to another, working efficiently whilst sparing your fingers from handling too much hot fabric.


While you could indulge in Fray-Check on the edges, I've found it's largely unnecessary.

Happy FabriCraning, everyone! I hope at least a few of Magpie Shinies' readers will have a flight sailing on their trees this season, and that you'll all pass the technique and the message along in the service of Peace On Earth.

Monday, December 13, 2010

Easiest-Ever Pet Mat - Tutorial

There are three constants in my life: crafts, books and cats. Our four are as much members of the family as any of us humans, and at this time of year they're always looking for cozy places to curl up, which can't always be your lap! With one of these mats that I made years ago literally shredding away at the edges, I figured the holidays was the perfect time to replace it. Besides, they've been good and not attempted to climb or topple the tree once! Yet.

It's absolutely easy to run up one of these in under an hour, with only three fabric ingredients, plus notions.

The main layer of your pet mat is out of fake fur or bathrobe fleece. I chose a terrific holiday-themed fleece from SAS Fabric By The Pound in Tucson.


Cut it out to the desired size. I usually try to make it roughly the size of the bottom of a pet carrier, so they can serve double-duty and keep kitty comfortable on the next trip to the vet.

For the next layer, cut a length of your preferred quilt batting to exactly the same size as your fleece. (If you're using fake fur which is very dense, you may not need this extra layer, but in most cases I've found it's essential and lends stability.)


Your final layer serves both as the backing and the binding for the mat. I chose a holiday print from my stash in this case, but you'll also have good success with denim, flannel, or whatever caught your eye in the remnant bin! Cut this backing fabric to about 2.5" wider on all sides than your fleece and batting pieces.


You're ready to start assembling. Layer your fleece fabric right side down, with the batting on top of it. Stitch the whole perimeter in a standard 5/8" seam. It's best to stitch with the batting side up so that you can be sure it doesn't bunch or fold. Batting also has a tendency to clog up your feed dog and bobbin mechanism. Do not trim the seam allowance! It's what will define the shape of the binding.


Now place your backing fabric right side down with the fleece/batting layer centered on it, right side up. Pin, and then stitch through all layers again, right along your previous stitching line. (If you want to give kitty an extra-special mat, you can sprinkle a bit of catnip between the batting and the backing layer before completing this step.)


Next, press the binding into shape. First, with the project right side up, fold the backing fabric up and over so that a fold is created along the edge of the fleece/batting's seam allowance. Press in a crease along that fold on all four sides, one side at a time.


Again, one side at a time, open out the backing fabric and fold it in half, so that the raw edge meets the line you just pressed in. Press again. This will be the edge of your backing.


Fold the pressed binding up on all four sides, so that the edge covers your previous stitching. I like to fold up the longer sides first, and then the ends, but you can do it either way. Pin in place.


Finally, topstitch the binding into place around all edges. I like to backtack to the outer edge of the fabric in both directions at all four corners, as a finishing touch and to ensure that no raw edges are accidentally exposed. You can hand-stitch the binding in place if you're feeling fussy about the stitching lining up evenly on the back side. I deliberately choose a busy print and unobtrusive thread and don't sweat this step too much. It's not a side anybody's going to see on a regular basis, and I'm more interested in durability than fine detail here.


Voila! Your pet's cozy new home is done!


You can use these almost anywhere: a favorite nesting place on the sofa, by the hearth, or, in our case, along the lower level of the garden window, where they love to watch the world and sun. They're easy to toss in the washer and dryer: just make sure they're not with a load of your clothes, if you added catnip, since that might result in an unexpected, nefarious assault on your closet. These would work great for small dogs as well; bigger dogs probably need something more robust and overstuffed. And what a thoughtful, quick gift for your pet-loving friends!

A few ideas, in closing:
  • This project is terrific for re-purposing older fabrics - bathrobes and pajamas that have outlived their usefulness, old blue jeans, etc.

  • You could use the same technique for quick and easy placemats, replacing the batting with a layer of fusible interfacing instead and only stitching the 5/8" perimeter seam once.

  • Obviously they don't have to be holiday-themed. I for one have a huge stash of cat-print fabric that I've collected for the cat quilt(s) that are still barely a gleam in my eye: some of them will end up in more of these.

  • As long as you're making one, and they're so quick and easy, why not run up a few extra and donate them to a local cat or small-animal rescue?